
Twelve hundred feet above Interstate 93 in dramatic Franconia Notch State Park lies the beginning of a 600 foot alpine ice climb that should be on every ice climbers wish list. Every time I have climbed this route I have thought of the young John Bouchard who grabbed the first ascent in an epic fashion that you should definitely read about in both An Ice Climber’s Guide to Northern New England and Yankee Rock & Ice (both available at International Mountain Equipment in North Conway).
Having successfully climbed it about a dozen times now (and bailed for various reasons at other times) I thought I would share some beta that might help you plan your ascent. I will be going into “more than guidebook” level detail so if you are one who prefers not to have any spoilers you might skip the sections below on Gear and Pitch Suggestions. If you’re the type that likes to scour internet forums for every slice of beta you can find maybe you’ll find something useful below!
Disclaimer: I am not an AMGA certified Alpine Guide nor have I taken the AMGA Ice Instructors Course. All the information below is liable to be incorrect. Using any of the below information is at your own risk. There are no guarantees that any of it is correct. Ice climbing is dangerous and death is possible. You are solely responsible for your safety. Seek qualified instruction.
Timing Beta
“Is it in yet?” is a common phrase heard in late Fall within the local ice climbing community. Without a doubt by mid-October climbers are peaking at NEIce.com and NEClimbs.com in anticipation of the first ascent of the season being reported. I’m not sure when the official “earliest” ascent has occurred but I do recall quite a few in mid-late October. These are usually done by some of the best climbers of the region and conditions can be so fickle that the route might be “gone” the very next day.

16 days after this ascent I was climbing the Whitney-Gilman Ridge (adjacent route) in a t-shirt and there wasn’t any trace of ice left in the adjacent gully! For the route to reach more consensual “in” conditions we usually need to wait until mid-November. So far for the 2018/2019 season the route had been in fantastic shape and I’ve climbed it on 12/7, 12/9, and 12/20. All three times I was able to skip the rock traverse, something I had never done in previous years (details below on this variation).
Another aspect of “Timing” is choosing a start time. There is no denying it, this is a sought after route and there are a lot of ice climbers with this on their to-do list. It is also a terrible route to decide to climb below another party. The last pitch often has surprisingly brittle ice even when the rest of the route seems pretty solid. Despite using the most amount of caution I’ve had to let some microwave sized chunks of ice go from the third pitch. The first and second two pitches offer virtually no safe space to protect yourself from ice above. If you choose to climb under another party you are taking a real risk… one I don’t feel is warranted.
So what can you do? Three tactics…
Start early. I mean really early. The approach takes 45-55 minutes… so plan to do that by headlamp. Arriving at the first pitch at first light is a great way to improve your odds of getting on route first. It’s also nice to be back at the car by noon!
Wait. Ok, another party beat you to the route. Size them up. Only a party of two? Local? Climbed it before? Well in good conditions strong parties can top this three pitch route out in 90 minutes… Got a warm belay jacket? Stack your rope and ask them to holler when off route so you know you can start climbing. Two or more parties ahead of you or too cold/windy to hang around… time to head over to Crawford Notch or Evans Notch for option 2.
Start late. As the days get longer later starts might be a good choice. Show up at noon and see a party finishing the last pitch? Perfect timing, you can probably make it back to the car before dark! Keep in mind later starts and approaching darkness add some risk should something unforeseen happen. Carry enough stuff to survive a night in these conditions just in case.
Weather Beta
Franconia Notch has earned a reputation for harsh weather when the rest of the state can seem quite comfortable. It’s common to drive up on clear calm conditions and pull into the parking lot to find gale force winds and frigid temps. The notch really does generate some of its own weather. To get a sense of what your day might be like start with the Higher Summits Forecast for a regional outlook then look closer at Cannon Mountain on Mountain-Forecast.com.
Gear Beta
Protection: In fat conditions (December 2018) the route can be well protected with just ice screws. I usually carry one 22 cm that I use for the first ice anchor and for v-threads if bailing, eight 13 cm screws, and two 10 cm screws. A couple mid-sized cams can make protecting the last few moves before gaining the snowy exit ramp convenient. In leaner conditions you might benefit from also carrying a small rack of nuts and perhaps a few pins.
Rope: The climb is most often done in three rope stretching 60 meter pitches, so in a party of two I prefer to climb it with a single skinny single rated rope like my Sterling Fusion Nano IX DryXP Climbing Rope. If you have to bail having only one rope does make that a bit trickier. From the top of the first pitch I have bailed with a single 60 by making a v-thread mid-pitch and doing a second rappel. From the pin anchor at the top of the second pitch you would need to v-thread 3 times to reach the ground. If you climb with 60 meter twins/doubles you would only need one rap from the top of the first pitch, or two from the pin anchor at the top of the second pitch (last rap would be from a v-thread). While a 70 meter might make the pitches seem a bit less “stretched” I don’t think carrying an extra 30 feet of rope up the route makes sense, but 70’s are gaining popularity and if that is what you have you’d still need to v-thread off if you only have one. Parties of three would be best served with two skinny (9mm or less) 60 meter single ropes.
Clothing: Cannon can be burly when it comes to weather. It is not a cragging day and the warmth of the car is far away. My clothing system for a Cannon day looks something like; mid-weight wool base layers, soft-shell pants and jacket, light synthetic insulated hooded puffy, large down insulated hooded parka. You can see a lot of my favorite specific models over on my gear review page along with my “essentials” picks here. There are lots of packs suitable for this style of climb and I am partial to my Hyperlite Mountain Gear 2400 Ice Pack for these types of missions that I reviewed here.
Communication: This is a great route to use a pair of FRS radios on. Almost every pitch is full length and it is difficult to communicate from both the top of pitch two and pitch three. I’ve started using radios on almost all alpine multi-pitch routes and don’t see me going back to losing my voice yelling “off belay” anytime soon.
Getting There
The climb is located in Franconia Notch State Park off of NH Interstate 93 (US Route 3). Coming from the south (Boston) the drive is about 2 hours in good conditions. From North Conway it takes about an hour to drive over the Kancamagus Highway. From Montreal it’s about 3 hours. My locals tip is to set your GPS to the Dunkin Donuts in Lincoln, NH, 44 Main St, Lincoln, NH 03251. They open at 5 AM and it’s a convenient place to stop for a high calorie breakfast sandwich and last-minute bathrooms. I also like to “boot up” here so when I get to the cold and snowy parking lot and can just toss on my pack and start walking. Arriving with boots on ready to start walking has put me ahead of other climbing parties on this route and in Crawford and Pinkham Notch so many times I can’t recommend it enough.
If you are going for a later start White Mountain Bagel opens at 6:30 am and for the truly casual start and best breakfast in Lincoln you can get in the door of Flapjacks at 7:00 am.
Approach Beta
Traditionally climbers would park at the “climber’s lot”, a small lot that is the first pull off after heading south from the Cannon Mt. Tram Exit (you reverse direction here if coming from the south). There is a small register box that is rarely used or checked in the winter and half the times I stop there are no forms or pencils to list your intended climb anyways. I do not park here, but I do pull through so I can get a quick look at how many cars are there. In the winter 95% of the cars parked here are probably gunning for the Black Dike, and if there are more than two cars I’m probably heading somewhere else. The most recent visit I saw two cars but both climbers were still inside them putting boots on so I pulled back onto the highway and headed to my preferred parking spot, Lafayette Place Campground, the next exit south. You can use Google Maps or Waze to get you to the Campground.
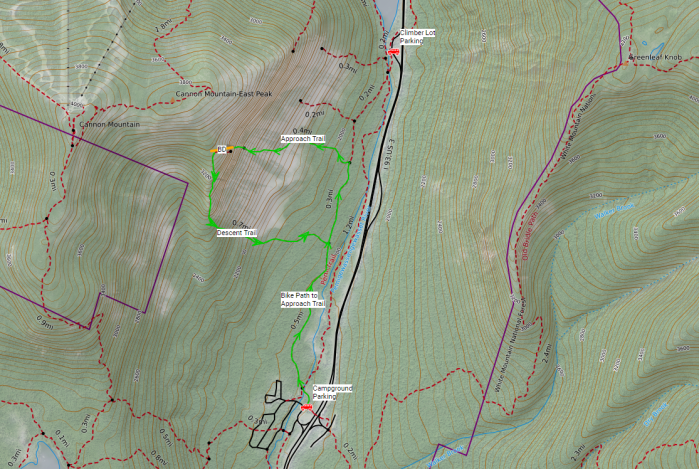
Approaching from the Lafayette Place Campground
Here there is plenty of parking when arriving early (5-7 am). I park right next to the bike path and head north on that path to the approach trail. This option is slightly longer than hiking from the climber’s lot, and slightly uphill, but has one big advantage. In half a mile it passes the descent trail. If you park at the climber’s lot you must then hike .65 miles uphill climbing back up 120 feet of elevation in the process. I prefer to walk .6 miles back downhill to the car at the end of the day.
Which ever approach you choose you might benefit from Microspikes. So far this year trail conditions have been so good they have not been needed, but that can change almost daily and Microspikes are way more comfortable on approaches and descents then having to stop and don your full on ice climbing crampons. Nailing the approach trail from the bike path can be tricky, and many have mistakenly taken one of the other approach trails that lead to other parts of the cliff (or the descent trail), and loss valuable time while heading to this climb. I once met a party who spent almost two hours approaching because they somehow took the northern Lakeview Approach trail and then had to traverse the bottom of the whole cliff.
It is just shy of a mile from the Lafayette Place Campground parking lot and about .4 miles from the climbers lot. At a brisk pace from the south it’s about 20 minutes, and you will pass the descent trail about half way there (don’t mistake that for the ascent trail!). For those with GPS capabilities it’s at 19T 0285700E, 4892603N WGS84, 1,913 elevation.
Once you break out of the woods and into the talus you still have 700 feet of elevation to gain. Some cairns mark a path but there is usually a packed out path you can follow that might be more efficient than the summer climbers path. Linking filled in snow fields can really make the footing easier while ascending to the route, with the obvious Whitney Gilman Ridge being the feature you should be working towards.
When you reach the base of the Whitney-Gilman Ridge you might opt to don harnesses, helmets, and crampons. The next 200 feet of snow climbing can sometimes be quite firm and the security of crampons and one ice axe can be prudent. In some snow conditions it might even be prudent to rope up and pitch this last part out. I have an old friend who took an unexpected ride down this approach pitch in an avalanche a decade ago and his partner suffered some serious injuries. It’s steep enough to avalanche so due diligence is a good idea.
There is often a “platform” stomped out about 50 feet below the start of the water ice from where most parties start to 5th class belay. Beyond that the snow slope steepens a little.
Leading Strategies
While not exactly part of a “route guide” I am going to interject some opinion on how a team tackles this route. While this next statement can open up a huge can of worms I’m going to simply say the best option is for the strongest partner to lead the whole route. Swapping leads is fun and all but in ice climbing it means one person will not be moving for quite a long time. During the swap the new leader hasn’t had the rest that the first leader has had… This topic is more complex and could go on for pages so I’m simply going to suggest that if you and your partner are of equal ability you just rock, paper, scissors for the lead role and have at it. Of course if during the climb the leader gets worked and wants to hand over the sharp end so be it, but if you are both climbing well the whole party will move faster and stay warmer if you do this route in one 3 pitch “block”.
Pitch Breakdowns and Variations

Pitch 1: Traditionally the first pitch is the easiest pitch. You start with 50 feet of snow climbing and gain the water ice. You place a screw or two and move a bit right. You place a few more screws and pick a spot to belay down and right of the infamous “rock traverse”. Most climbers probably place 5-6 screws on this pitch. The ice anchor built is usually a 2-screw anchor down and right of the traverse. It’s a good idea not to really stretch the rope and anchor right below the traverse so that the next lead can get some rope and a good screw in the system before they start the rock traverse. I’d say about 15 feet below the rock traverse is a great spot to post up.

Pitch 1 Variation: In good conditions (like December 2018) the ice on the second pitch may be thick enough to offer full strength screws allowing one to avoid the rock traverse and take a more direct (left) line. If this is the plan leaders can stay a bit left on the first pitch and create an ice anchor a little lower than the traditional anchor spot just before the steeper ice. This spot is a little more exposed to falling ice from the 2nd pitch so a good strategy is for the belayer to clove in with a bit of a long length of rope to allow for some ice dodging mobility. About a ten foot length worked well on my last two climbs and also allows for a bit more rope in the system when pulling a moderate but sometimes awkward first couple moves off the anchor.
Pitch 2 (rock traverse): There’s a lot of hype about this rock traverse… the thing is it’s actually quite chill. While the guidebooks says (5.6) it’s often much easier, just awkward and somewhat exposed. The real crux is finding the feet when the ledges have fresh snow on them. That and not hosing yourself with rope drag. In good conditions you can leave the 1st pitch anchor, climb up 15 or so feet, place a good screw with an extended alpine draws, and start moving left along the traverse. Only a step or two will let you reach some fixed tat that protects the traverse, then you need to get established on the steeper ice that becomes the routes first technical crux. It’s really not that bad, but can be awkward. As soon as you get established on the steeper ice the desire to place a screw can be strong. If the sticks are good try to get a few moves up. This will save you a lot of rope drag that you might notice at the end of this full length pitch. Where the steeper ice recedes is IMO the technical crux of the route… it is often fractured and brittle here. A few deep breaths and another good screw should see you into some lower angle terrain.

Most of the rest of the second pitch is enjoyable for a climber comfortable with Grade 4 ice. I choose to run it out a bit here to conserve screws. The second route crux appears near some often parasol type ice when you need to move into a bit of a chimney spot and the feet feel awkward. I get a good screw here then pull through by looking at the left wall for stemming options constantly. One or two more screws will see you staring at the pin anchor and the end of the Grade 4 style ice climbing.
Pitch 2 (left direct): When in good shape one can choose to stay left on the first pitch and gain the runnel directly negating the need for the rock traverse. In some ways this feels easier as line is more direct and you can easily get established on the steeper bit. In thin conditions this can be quite bold as it might not take 10 cm screws and there isn’t anything for rock gear here. So thin conditions, do the rock traverse… thick conditions, check this option out. After 30 feet or so of climbing you will see the rock traverse on your right just before the first steeper crux mentioned above.

Pitch 2 Anchor: As of December 2018 there is a 3 pin anchor equalized with some cord at the top of the second pitch with two steel cold shuts on it. The easiest option is to use a large shaped locking carabiner through the two cold shots as a “master carabiner”, then anchor and belay as norm. There are also plenty of options here for an ice anchor, and if you stop 20 feet lower you can watch/coach your partner through the crux.
Pitch 3: The last pitch starts off really mellow on often wet plastic ice before gaining some drier steeper bits. The line is usually pretty clear, but care should be taken as it isn’t over yet. The ice on pitch three can go from plastic here to dinner-plate-central here in only a few feet. Keep that game face on. The regular route stays left and as the water ice diminishes there’s some decent rock gear placements on the right just before you reach the snow-ramp-exit. You can get short screws here but cams are much faster if you have them. Once you reach the snow you can start getting turf shots but stay focused. An experienced climber fell from here two years ago and ended up with a broken femur and involved rescue. About 20 feet from the top I throw a sling around a small tree on the right to protect my last few moves to the top.
Pitch 3 right hand finish: Last year I did the right hand finish a few times and found it pretty fun. It’s a bit more awkward and ends a little prematurely but in certain conditions it might be a better exit.
Descent Info
The descent trail is pretty easy to pickup and follow though it is steep at times. I’ve had to wear crampons for the whole descent on some years, Microspikes other times, and at-least once been able to butt-glissade the majority of the descent in record time. My advice, make sure your shit is secure! Over the years I’ve seen quite a few “lost ice axe/screws” posts online from people glissading down the descent trail. Secure one axe, and keep one out if the glissading is good. Do not glissade with crampons on! Pack your harness and screws for the hike out. Once you reach the bike trail bang a right and head to the car (or a left and walk uphill if you choose the climber lot).
Apres Climb
Time to refuel and rejoice as you just knocked off one of the most historic and well-known ice climbs in the East! A few of our favorite post climb spots in Lincoln, NH:
Black Mountain Burger Co.– Excellent gourmet burgers and hand cut fries, high-end craft beers and cocktails.
Woodstock Inn Station & Brewery– Large place with usually plenty of room at the bar, good beers and extensive menu. Make it in time for Happy Hour (3-5 pm) and enjoy half price apps and $3.50 pints on most of their beers!
Guided Trips (Am I ready?)
If this is a trip you’d prefer to do with a guide feel free to reach out to me. It is a serious undertaking so a shakedown cragging day may be suggested before we set our sights on this route. Climbers should be very comfortable following Grade 4+ ice before attempting to follow this route. A suggested progression to determine if you will enjoy the climb…
A season of top-rope ice experience.
Successfully following efficiently a full length climb of Mount Willard (Hitchcock or Left Hand Monkey Wrench to Cleft).
Comfortably following Standard to Penguin and Dracula (Frankenstein Cliffs) in one day.
Comfortable following Pinnacle Gully in Huntington Ravine.
This is just a broad suggestion of local objectives that would help determine when you might be ready for the Black Dike. Every climber learns at their own pace and a route like the Black Dike is worth waiting for a decent weather window, conditions, level of fitness, and technique.
Summary
I hope this article helps you plan your ascent of this New England classic someday! Even after 15 years of climbing this route I am blown away that we have such a thing in the East. Feel free to leave a comment below if you have any questions or if you have some tips you’d like to share. I’ll leave you with some stunning video my friend Dave captured of my last ascent of the route in late December 2018. If your internet connection can handle it be sure to watch in full screen and 4K resolution! Enjoy!


Personally, I loved the detail and the beta. I’m not sure if I’ll ever progress enough to climb this but the descriptions and especially the photos really give a sense of the atmosphere and what to expect on the climb.
LikeLiked by 1 person
https://photos.app.goo.gl/QL2FrCiccHdiKT2a8 Since you’re going for a comprehensive guide, I’ll mention that the little gully before the start occasionally seems to avalanche. (Couple of photos linked in a Google Photos Album)
LikeLiked by 1 person
Thanks for the comment and sharing the photos! Yes! I mentioned that in the article as I have a friend who triggered a slide there and whose buddy suffered serious injuries a few years ago! May I use one of those photos in the post?
LikeLike
Oh yikes, reading comprehesion fail on my part. Sorry! Yah feel free to use a photo.
LikeLike
Comprehension*
LikeLike
Super useful beta. Looks like a fun climb!
LikeLiked by 1 person
[…] Black Dike Route Guide (some spoilers) […]
LikeLike
[…] David Lottmann of Northeast Alpine Start has a great Guide for the Black Dike. You can view it here… […]
LikeLike